Connecting/Logging in
All the connections to the Hoffman2 Cluster are based on a secure protocol that requires authentication. Currently we support the following ways to connect to the cluster:
via terminal emulator and SSH client on your local machine
via remote desktop
it is also possible to perform remote direct rendering on GPU nodes.
As all connections are based on a secure protocol, when logging in for the first time, for security reasons, you will be asked to confirm the authenticity of the host you are connecting to by double checking the hostkey fingerprint.
Connecting via terminal and SSH
One of the most powerful ways to use the cluster is via a Unix shell, such as Bash, tcsh, or others. Unix shells are programs that provide an interface between the user and the operating system via the command-line shell prompt onto which the user types commands. A Unix shell is executed by a terminal program. Depending on the operating system of your computer, you have several choices for which terminal to use when connecting with the cluster.
On any Linux distribution, you can use the standard SSH-client generally installed with the OS and available via any terminal application.
On macOS (the operating system running on Mac computers) an SSH-client is available and can be used via the Terminal application (although other terminal programs are also available for macOS). The Terminal application can be located via Spotlight Search or Finder.
On Windows, install any one of the following free ssh client programs, which offer a terminal emulator for connecting to remote computers. The order in which options are ordered from our most to least recommended applications (users may still opt for different solutions):
MobaXterm an SSH client that includes an X11 server (for running GUI applications).
Git Bash an emulation shell provided by Git for Windows
Windows Subsystem for Linux: A Windows native compatibility layer for running Linux binaries on Windows (available from Windows 10).
Putty an open source SSH and telnet client.
Cygwin a collection of tools that provide Linux functionalities in Windows systems.
See: Setting up SSH clients for Windows to learn how to install and customize some of the terminal clients mentioned here.
Important
Once you have identified your terminal application open it and issue:
$ ssh login_id@hoffman2.idre.ucla.edu
substitute login_id with your Hoffman2 Cluster user name.
See SSH customization to learn how to prevent SSH connections dropping and more.
Problems with the instructions on this section? Please send comments here.
Opening GUI applications
Some interactive applications (e.g., Matlab Desktop, Mathematica Notebooks, gnuplot, etc.) require the ability to open a graphical user interface (GUI) window and interact with it using your local display. Assuming that you have installed a local X Window System you can then update your SSH command to perform X11 Forwarding.
This section, and the Connecting via remote desktop section, cover cases in which no direct rendering is required (and software rendering is performed instead).
On UNIX-like systems, an X Window System server is generally available and running with the default installation (or can be readily installed via the OS package manager). You can enable X11 Forwarding (that is the ability to visualize, on your local computer, GUI applications running remotely on the cluster) by adding the -X flag to the ssh command you use to connect to the cluster. To do so, type into your terminal window:
$ ssh -X login_id@hoffman2.idre.ucla.eduwhere
login_idis replaced by your cluster user name. See SSH customization to learn how to modify your local$HOME/.ssh/configfile in place of adding-Xto yoursshcommand.
On macOS (i.e., the operating system running in Mac computers) the X windows system is called XQuartz which can be downloaded from the XQuartz page. As indirect GLX was disabled by default in Xorg 1.17, starting from XQuartz version 2.7.9, to enable indirect GLX and to allow remote visualization on the cluster, you will have to open the macOS Terminal application and (before connecting to the cluster) issue the command:
$ defaults write org.macosforge.xquartz.X11 enable_iglx -bool true
Note
You will need to reboot your machine before being able to open GUI applications on Hoffman2.
The macOS Terminal application can be used to connect to the cluster (although other terminal programs are also available for macOS). To enable X11 Forwarding (i.e., the ability to visualize, on your local computer, GUI applications running remotely on the cluster) type into your terminal window:
$ ssh -Y login_id@hoffman2.idre.ucla.edu
where login_id is replaced by your cluster user name. See SSH customization to learn how to modify your local $HOME/.ssh/config file in place of adding -X to your ssh command.
Note
By default, macOS assumes that a ssh -X connection is untrusted and you therefore need to use ssh -Y`.
Starting from Windows 10, Windows Subsystem for Linux or PowerShell can be used as terminal with SSH clients but third party X servers need to be installed to allow X11 Forwarding (i.e., the ability to visualize, on your local computer, GUI applications running remotely on the cluster). Third-party terminals (with or without X servers) can also be installed. Here is a list of possible choices ordered from our most to least recommended applications (users may still opt for different solutions):
Some stand alone software that bundles terminal, SSH client and X Server:
MobaXterm: MobaXterm is an enhanced terminal for Windows with X11 server, SSH client, network tools, and much more. A free version is available.
Xshell: Xshell is a commercial option, a free version is available for academic use.
Cygwin/X: Cygwin is a free Linux-like environment for Windows. To add Cygwin/X server, select the
xinitpackage from the X11 category.Some X servers that can be used in conjunction with terminal and SSH Clients:
Xming and Xming fonts: Xming and Xming fonts are a no-cost X Window System Server for Microsoft.
VcXsrv : VcXsrv is a free X Window System Server for Microsoft.
Terminals and SSH Clients that support X11 Forwarding and should be used with an X server:
Git Bash an emulation shell provided by Git for Windows
Windows Subsystem for Linux: A Windows native compatibility layer for running Linux binaries on Windows (available from Windows 10).
Putty an open source SSH and telnet client.
Please refer to Setting up SSH clients for Windows to learn how to install and configure some of the software described here.
Problems with the instructions on this section? Please send comments here
SSH customization
Prevent SSH connection dropping
To prevent SSH connections dropping, you could add to your SSH command:
ssh -o ServerAliveInterval=30 -o ServerAliveCountMax=5 -o IPQoS=throughput login_id@hoffman2.idre.ucla.edu
where login_id is replaced by your cluster user name.
For convenience we recommend setting the following entries in your ssh_config file or your local $HOME/.ssh/config (you may need to create such file):
Host *
  ServerAliveInterval 30
  ServerAliveCountMax 5
  IPQoS throughput
X11 Forwarding
You can override the ssh default for all your sessions on the Hoffman2 cluster by creating (or adding to) a file named config in the $HOME/.ssh local directory on your computer and adding the options:
Host *
  ForwardX11Trusted yes
  ForwardX11 yes
where
login_idis replaced by your cluster user name. You can then login on the cluster as userlogin_idsimply issuing:$ ssh hoffman2
Hoffman2 Cluster specific customization
To make customization specific to your account on the Hoffman2 Cluster
Host hoffman2
  HostName hoffman2.idre.ucla.edu
  User substitute_your_H2_login_id_here
  ServerAliveInterval 30
  ServerAliveCountMax 5
  IPQoS throughput
  ForwardX11Trusted yes
  ForwardX11 yes
where
substitute_your_H2_login_id_hereis replaced by your cluster user name. After setting the can then log onto the cluster via:$ ssh hoffman2
Problems with the instructions on this section? Please send comments here
Setting up SSH clients for Windows
Instructions for MobaXterm
Download and install the MobaXterm Home Edition, either the Portable or Installer edition will work. To log into the Hoffman2 Cluster open MobaXterm and click on the Session button (the Sessions button is circled in green in MobaXterm application with the Sessions button circled in green.).
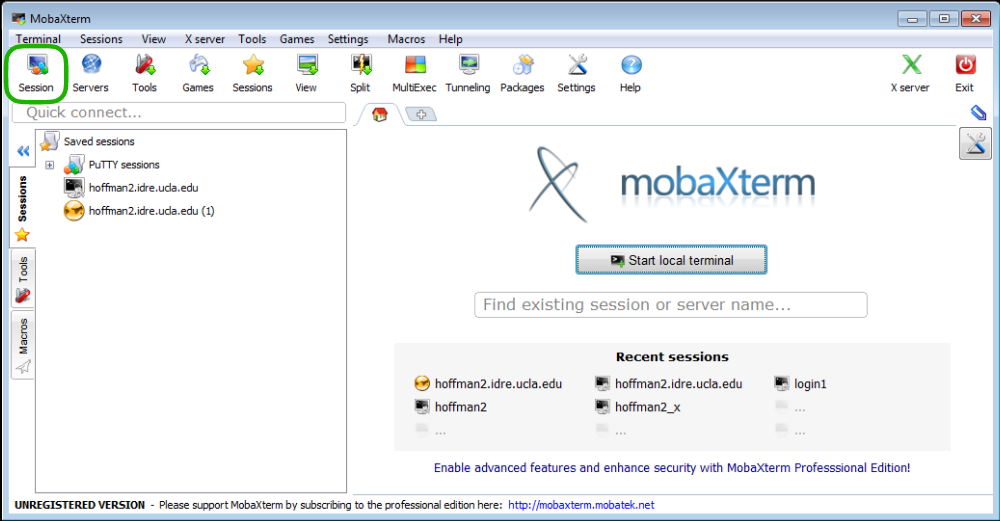
MobaXterm application with the Sessions button circled in green.
A new window will pop-up to allow you to choose a type of session. Choose SSH by clicking on the SSH button (upper left corner) and fill the Remote host field with the Hoffman2 Cluster address, that is:
hoffman2.idre.ucla.edu
save the session by pressing the OK button.
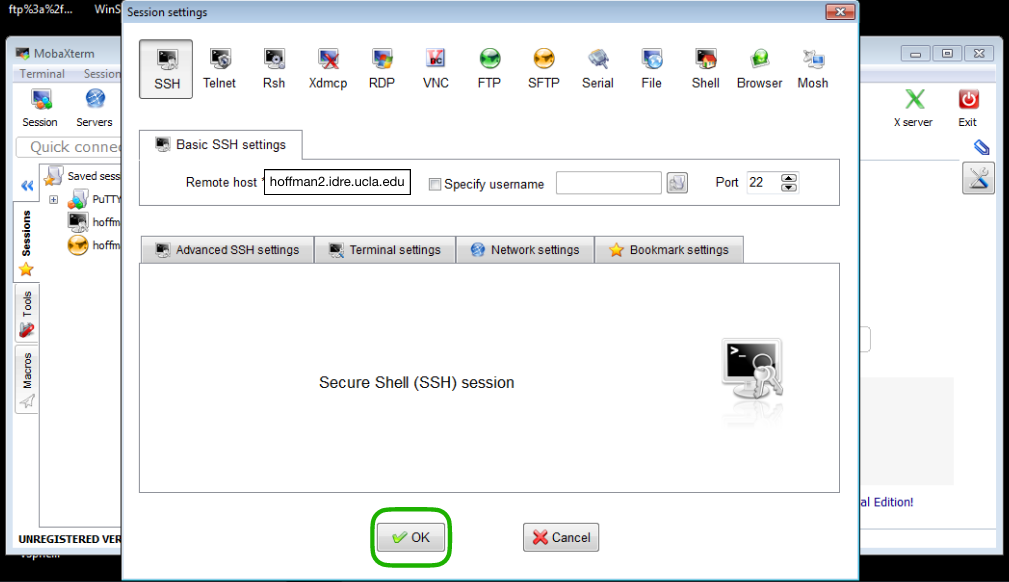
MobaXterm application with the SSH session set for Hoffman2.
You can also create a new session type which you will use to transfer
files back and from the cluster to your local machine, by selecting
the Sessions button again and choosing SFTP as the session type and fill the Remote host field with the Hoffman2 Cluster data transfer node address, that is:
dtn.hoffman2.idre.ucla.edu
save the session by pressing the OK button.
To access the cluster double click on the save SSH session.
Problems with the instructions on this section? Please send comments here.
Instructions for XMing and GitBash
Download and install XMing and Xming fonts following the installer instructions. Download and install GitBash following the installer instructions.
Start Xming from the programs, open GibBAsh from the Start Menu, at its shell prompt issue:
$ export DISPLAY=localhost:0
Connect to the Hoffman2 Cluster by typing:
$ ssh -XY login_id@hoffman2.idre.ucla.edu
where login_id is replaced by your cluster user name.
Instructions for Cygwin users
Install Cygwin (including the X11 packages) on your Windows system.
Open a Cygwin terminal.
Enter the command:
startxwin. This starts the X11 server on your Windows computer.In the (graphical) window that pops up, use the command
ssh -X login_id@hoffman2.idre.ucla.eduwherelogin_idis replaced by your cluster user name.
Problems with the instructions on this section? Please send comments here.
Instructions for Windows Subsystem for Linux
Starting from Windows 10, Windows offers a compatibility layer for running Linux binaries on Windows. The Windows Subsystems for Linux (WSL) needs to be enabled before it can work. You can enable WSL via Windows Settings or typing commands on a Windows PowerShell.
From the Start Menu:
open Settings
click on Apps
scroll down to Related Settings
click on Programs and Features
click on Turn on Windows features on or off
scroll down and select Windows Subsystems for Linux and click on the OK button
click on Restart Now button
At this point you can access the Microsoft store to install a Linux distribution or start using the WSL shell provided by Microsoft.
See WSL Microsoft documentation to learn how to enable WSL via Windows PowerShell.
Problems with the instructions on this section? Please send comments here.
Connecting via remote desktop
NX is a secure, compressed protocol for remote X Window System connections for Windows, Linux, Mac OSX, and Solaris that allows users to open a virtual desktop on the cluster. We currently support connecting to the Hoffman2 cluster via the NoMachine client as well as the X2Go client. Advantages of connecting to the cluster via the NX protocol are: speed and the ability to suspend and reconnect to a virtual desktop session.
NoMachine client
Download NoMachine Client for your operating system
A free NoMachine client is available from NoMachine for Windows, Mac OSX, and most Linux distributions.
Download NoMachine from the website
Use the download link for your operating system (Windows, Mac OSX, or Linux Distributions)
Install
Once downloaded, double click on the downloaded package file.
Click the
Run/Installbutton.When the NoMachine Client Setup Wizard starts, accept all the setup defaults.
Configure
Open the NoMachine client and continue to the connection page
Click on the
Newlink to create a connection to the Hoffman2 ClusterSpecify the protocol as
SSHand pressContinueProvide the host name
nx.hoffman2.idre.ucla.edu*Leave the port field set to 22 and press the
ContinuebuttonSelect
Use the system loginand press theContinuebuttonSelect
Passwordand press theContinuebuttonSelect
Don’t use a proxyand press theContinuebuttonName your connection and press the
Donebutton
Please notice that if you are planning to suspend and reconnect to an NX session, you will need to repeat the configuration steps described above for the hosts:
nx1.hoffman2.idre.ucla.edu
nx2.hoffman2.idre.ucla.edu
Run
Open the NoMachine client and continue to the connection page
Click on the saved connection that you previously configured
Enter your username and password and your NX session with a virtual desktop on the cluster will start
The first time you connect to one of the Hoffman2 Cluster NX servers, the NX client software running on your local computer will prompt you with the fingerprint hash for the remote NX server, e.g.
The authenticity of host nx.hoffman2.idre.ucla.edu, 192.154.2.217, can't be established.
The RSA key fingerprint is:
SHA256 91 A8 7D 04 9C 12 CE B9 45 9D 5A 7D 4E 0F 84 97 62 1D 70 23 7B 26 03 79 F9 4A F6 47 22 1D BF 03.
Are you sure you want to continue connecting?
Since the SHA256 fingerprint in the box above matches one of the RSA fingerprints for the Hoffman2 Cluster public hosts, you know you’re connecting to a Hoffman2 Cluster NX server and can continue the connection to get a NX session.
Warning
Only proceed to connect if the RSA key fingerprint displayed in the prompted message corresponds to one of the RSA fingerprints for the Hoffman2 Cluster public hosts.
If the RSA key fingerprint does not match, do not continue authentication and instead, contact support@idre.ucla.edu.
How to get a terminal window
After you have logged into the Hoffman2 remote desktop, click on the Applications menu. Then select System Tools and Terminal.
Note
To pin the terminal to the panel, right click on the Terminal menu item and select Add this launcher to panel.
How to terminate your NX session
From the remote desktop, select:
System -> Log Out login_id …
A small window will open. Click the Log Out button.
How to suspend an NX session
Make note of the actual NX node where your session is running (typically NX1 or NX2) to allow for future reconnections. To terminate the NX client on your computer, close the application or close the virtual desktop window.
How to reconnect to a suspended NX session
If you are planning to reconnect to a session, make note of the actual NX node where your session is running (typically NX1 or NX2). Make sure to configure your NX client for the NX node where your session is running. You will need to create a configuration using either nx1.hoffman2.idre.ucla.edu or nx2.hoffman2.idre.ucla.edu. See the Configuration section for more detailed instructions.
Note
Reconnecting to a suspended NX session is not always possible. Lengthy computations should be run as batch jobs. We recommend terminating NX sessions (logout) instead of suspending them.
On fast networks, a preferred alternative to NX is to run an X server on your platform (e.g., X11 packages for linux platforms, XQuartz for mac OSX, XMing and Xming fonts for Windows), and connect to the cluster via a terminal (or via PuTTY on Windows platforms) by setting up X11 forwarding.
X2Go client
Install X2Go client
Follow the installation guide at X2Go site. Download the X2Go client, select the appropriate client for your operating system (Windows, Mac OS, Linux) and the correct version onto your computer.
Double click on the downloaded package, accept the licensing terms, and follow the instruction on the screen.
Note
macOS users will need to install the XQuartz dependency prior to installing X2Go. It may be obtained on the XQuartz website. You may encounter a security warning prompting you that x2goclient.app is from an unidentified developer. Simply right click on the app again and select Open. See also the Mac portion of Opening GUI applications.
Configure the X2Go client to connect to Hoffman2
Launch the application by double clicking on the X2Go Client desktop icon, if you have chosen to create one during installation, or by searching for the application in your Applications folder and double clicking on the x2goclient icon. If prompted by the Windows Firewall, select Allow access so that sshd.exe and other X2Go related programs will be able to run.
Create a new session
From the Session tab in the X2Go client select New session. You can name your session with any name (e.g., x2go@hoffman2). Leave the Path field unchanged and in the Host field enter:
x2go.hoffman2.idre.ucla.edu
Leave the other fields unchanged and choose the Session type to be MATE or Xfce. Save the new session by pressing the OK button.
You can also create sessions for the specific nodes x2go1 and x2go2 if you will need to reconnect to a suspended session. However, we strongly suggest you start new sessions by using the session associated with the x2go.hoffman2.idre.ucla.edu address. Sessions on the x2go1 and x2go2 nodes can be created by using in the “Host” field respectively:
x2go1.hoffman2.idre.ucla.edu
x2go2.hoffman2.idre.ucla.edu
Name the sessions accordingly (for example: x2go1@hoffman2, x2go2@hoffman2).
Start the X2Go client
To connect to the Hoffman2 cluster open the X2Go client, double click on an already created session, and enter your Hoffman2 username and password.
The first time you connect to a remote x2goserver, your x2goclient software will prompt to trust the remote servers’ host key.
The server is unknown.  Do you truyst the host key?
Public key hash: x2go.hoffman2.idre.ucla.edu:22 -
b7:e0:12:dc:93:e4:3f:12:6f:72:c0:fb:cf:ad:d5:7a:47:1a:9a:df
Since the SHA1 fingerprint in the box above matches one of the RSA fingerprints for the Hoffman2 Cluster public hosts, you know you’re connecting to a Hoffman2 Cluster x2go server and can continue the connection to get a virtual desktop session.
Warning
Only proceed to connect if the RSA key fingerprint displayed in the prompted message corresponds to one of the RSA fingerprints for the Hoffman2 Cluster public hosts.
If the RSA key fingerprint does not match, do not continue authentication and instead, contact support@idre.ucla.edu.
Do so by pressing the Yes button. On Windows, a few more firewalls will pop up and you will have to allow access to the X2Go Client and associated programs.
You should now be connected to a remote desktop on the Hoffman2 cluster.
Problems with the instructions on this section? Please send comments here.
Connecting via Jupyter Notebook/Lab
It is possible to connect to the Hoffman2 Cluster via the web application Jupyter Notebook, or Jupyter Lab. A Jupyter Notebook/Lab is a multi-language environment for interactive computing especially well suited for agile prototyping and sharing of code.
Tip
While you can connect to Hoffman2 with X11-Forwarding and run a Jupyter Notebook on a remote web-browser instance running on the Hoffman2 cluster, running Jupyter Notebook or Jupyter Lab on your local browser is a preferred strategy that can eliminate substantial latency.
The following are directions on how to run a Jupyter Notebook, or Jupyter Lab, on the Hoffman2 Cluster while displaying it on a browser local to your computer.
Required software on your local computer
On your local computer you will need to have:
Connecting from Linux or MacOS
A terminal application and an SSH client are installed as part of the operating system in Linux or MacOS. An installation of python is also generally available with the operating system or it can be readily installed from Python.org.
Connecting from Windows
On Windows you can use serveral terminal emulators, including: Git Bash, MobaXterm and, if available, Windows Subsystems for Linux (WSL).
Depending on the type of terminal you will need to install python on your local computer in different ways:
If installing python from Python.org make sure to check the box: Add Python to PATH (e.g.: Add Python 3.10 to PATH).
To run the h2jupynb script via mobaXterm you will need to install python via:
$ apt-get install python3
To run the h2jupynb script via mobaXterm you will need to install python via:
$ sudo apt-get install python3
Downloading the h2jupynb script
The script h2jupynb can be downloaded by issuing the following command on a terminal open on your local computer (and not connected to the Hoffman2 Cluster):
$ wget https://raw.githubusercontent.com/rdauria/jupyter-notebook/main/h2jupynb
or, if wget is not available on your system:
$ curl -O https://raw.githubusercontent.com/rdauria/jupyter-notebook/main/h2jupynb
you can then make the python script executable issuing the command:
$ chmod u+x h2jupynb
the script can then be generally executed, for example to see its help menu, with:
$ h2jupynb --help
or:
$ python h2jupynb --help
Starting a Jupyter Notebook session
Warning
The script h2jupynb should be run from a terminal open on your client machine and not on a terminal already connected to the Hoffman2 cluster.
To start a jupyter notebook that will use one computational core, one GB of memory and run for two hours (see: Requesting resources for your Jupyter Notebook session to learn how to request specific resources for your Jupyter notebook session), issue:
$ ./h2jupynb -u user_id
or with:
$ python h2jupynb -u user_id
or with:
$ python3 h2jupynb -u user_id
where user_id is your Hoffman2 Cluster user name.
Note
Unless you have set up passwordless authentication, you will be prompted to enter your Hoffman2 Cluster password twice.
At the end of a successful negotiation (which generally ends after you enter your password a second time), depending on the terminal that you are running, you should see a message similar to:
Warning: No xauth data; using fake authentication data for X11 forwarding.
Pseudo-terminal will not be allocated because stdin is not a terminal.
or:
Warning: No xauth data; using fake authentication data for X11 forwarding.
Pseudo-terminal will not be allocated because stdin is not a terminal.
TUNNEL
Succesfully opened notebook!
Kill this process to end your notebook connection.
Note
If you are connecting from GitBash to see the full output of the h2jupynb script as it negotiates the opening of a Jupyter session, use:
$ python -u h2jupynb -u user_id
or:
$ python3 -u h2jupynb -u user_id
Starting a Jupyter LAB session
Please download the latest version of the h2jupynb script and start a Jupyter Notebook session as described in Starting a Jupyter Notebook session.
When you get to the jupyter session on your browser, go to the address bar and modify it so that instead of localhost:PORT/tree it will have localhost:PORT/lab. For example, should your address will look like:
http://localhost:9394/tree
replace tree with lab as in:
http://localhost:9394/lab
A jupyter lab session should start.
Securing your Jupyter Sessions
From the New menu of your Jupyter Session select Terminal, at the terminal prompt issue:
$ jupyter notebook password
we recommend that you select a password different than your Hoffman2 Cluster account password. Your selected hashed password will be stored in:
$HOME/.jupyter/jupyter_notebook_config.json
should you forget the password, remove the $HOME/.jupyter/jupyter_notebook_config.json file and re-run the command jupyter notebook password to set your Jupyter password anew.
Requesting resources for your Jupyter Notebook session
By default the remote Jupyter Notebook starts in an interactive session with the following computing resources: 1GB of memory, one core, and a run-time of up to 2 hours. To learn how to change the default options, run:
$ ./h2jupynb --help
which will give you an output similar to the following:
Usage:

h2jupynb [-u <Hoffman2 user name>] [-v <python-version>]
         [-t <time, integer number of hours>] [-m <memory, integer number of GB per core>]
         [-e <parallel environment: 1 for shared, 2 for distributed>] [-s <number of slots>]
         [-o <run on group owned nodes: yes/no>] [-x <run on an exclusively reserved node: yes/no>]
         [-a <CPU-type>] [-d <path to directory from which the jupyter NB/lab will start>]
         [-g <run on a gpu node: yes/no>] [-c <gpu-card-type>] [-l <cuda-version>]
         [-p <port number>]

If no arguments are given to this script it is assumed that:

         your Hoffman2 user name is the same as on your client machine
         the time duration for your session is of 2 hours
         the parallel environment is shared
         the memory per slot for your session is of 1GB
         the number of slots for your session is of 1
         the python version for your notebook is 3.9.6
         the port on which the server is started is 8789
         the starting directory on Hoffman2 is your $HOME
         use GPU? default is no
         GPU type default is RTX2080Ti (if -g yes)
         CUDA version 10.2 (if -g yes)
         not running on owned nodes
         not running in exclusive mode
         no specific CPU selected (see "ARCH" in output of "qhost")

         python versions currently available are: 2.7.18, 3.7.3, 3.9.6, anaconda3
         cuda versions currently available are: 9.2, 10.0, 10.2, 11.0
         GPU cards currently publicly available are: P4, RTX2080Ti, V100

         **Should you specify non existing parameters default values will be assumed**
For example, user joebruin could request a Jupyter Notebook session that will run for 5 hours on a node with an Intel Gold processor and use up to 10 GB of memory (and 1 core) with:
$ ./h2jupynb -u joebruin -t 5 -m 10 -a "intel-gold\*"
Running python kernels in Jupyter
On the Hoffman2 Cluster several versions of python are supported. Depending on the version chosen when starting the jupyter notebook (for example via the -v <VERSION> switch to the h2jupynb script) a corresponding version of python will be available via the ipython kernel.
To see which versions of python on the Hoffman2 Cluster are supported issue:
$ ./h2jupynb --help
among other information the command currently returns:
python versions currently available are: 2.7.18, 3.7.3, 3.9.6, anaconda3
Accordingly, in order to select, for example, python version 3.9.6, user joebruin would issue:
$ ./h2jupynb -u joebruin -v 3.9.6
Installing python libraries via Pip in a python notebook
To install numpy, for example, in a python jupyter notebook type in a notebook cell:
In [1]: import sys
   ...: !{sys.executable} -m pip install numpy --user
Note
If you are running a in a python virtual environment kernel you will not need to add the --user flag.
Running anaconda python kernels in Jupyter
It is possible to run Jupyter Notebook/Lab under one of the Anaconda python installation centrally installed on the cluster. The h2jupynb script supports several versions of anaconda. To see which versions are supported use:
$ ./h2jupynb --help
To run a Jupyter session using, for example, the default anaconda3 version on the Hoffman2 Cluster, user joebuin would use:
$ ./h2jupynb -u joebruin -v anaconda3
Running python/anaconda virtual environment kernels in Jupyter
You may need to run a Jupyter notebook on a python or anaconda virtual environment. To do so you will need to install the ipykernel in the python/conda environment. Here we show how you can do so in an previously created anaconda virtual environment called MYCONDAENV:
$ qrsh -l h_data=6G,h_rt=1:00:00
$ module load anaconda3
$ conda activate MYCONDAENV  # activate previously created environment
$ conda install ipykernel
$ python -m ipykernel install --user --name=MYCONDAENV --display-name "MYCONDAENV"
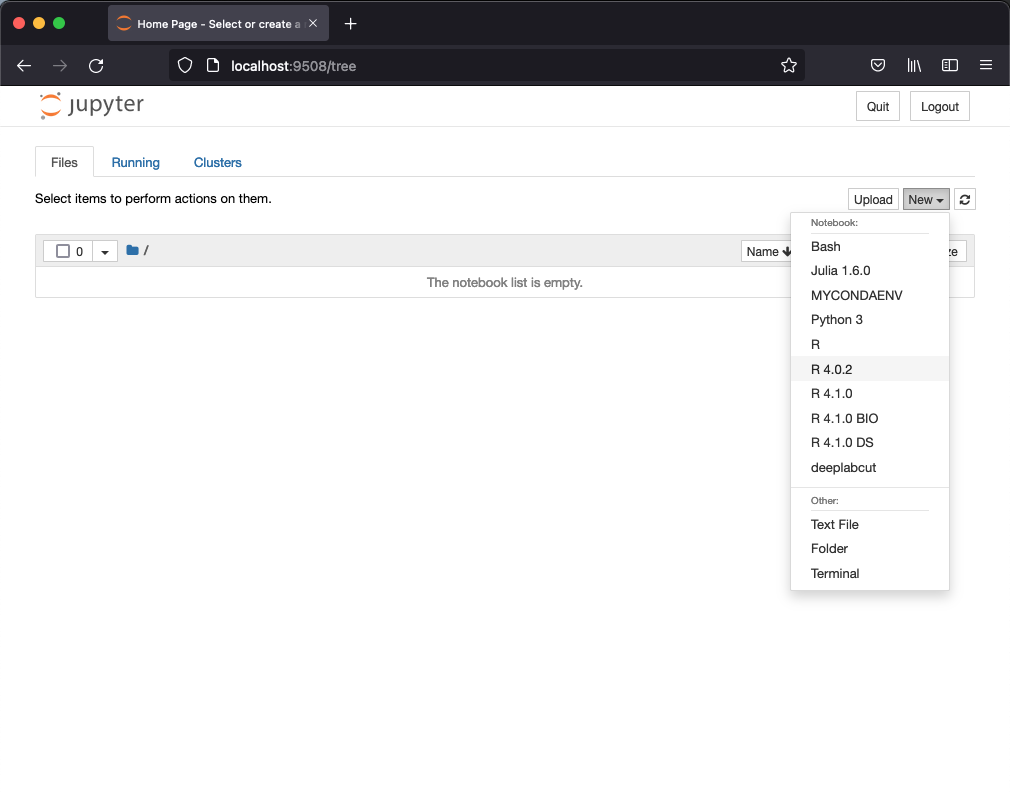
After starting a Jupyter notebook you should see MYCONADENV in the list of possible kernels to start as shown in the figure below.
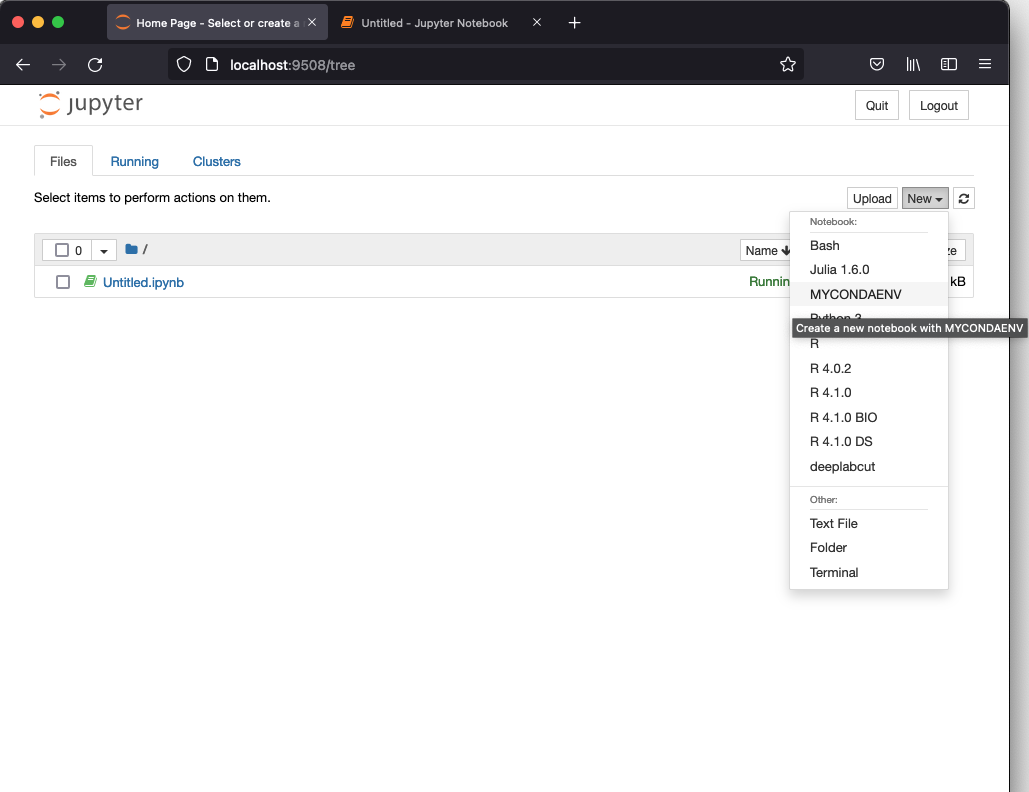
Jupyter Notebook interface with the launcher menu showing, among others, the MYCONDAENV kernel.
Upon opening the MYCONDAENV notebook, it is easy to verify that we are indeed in a conda environment, for example user joebruin would see:
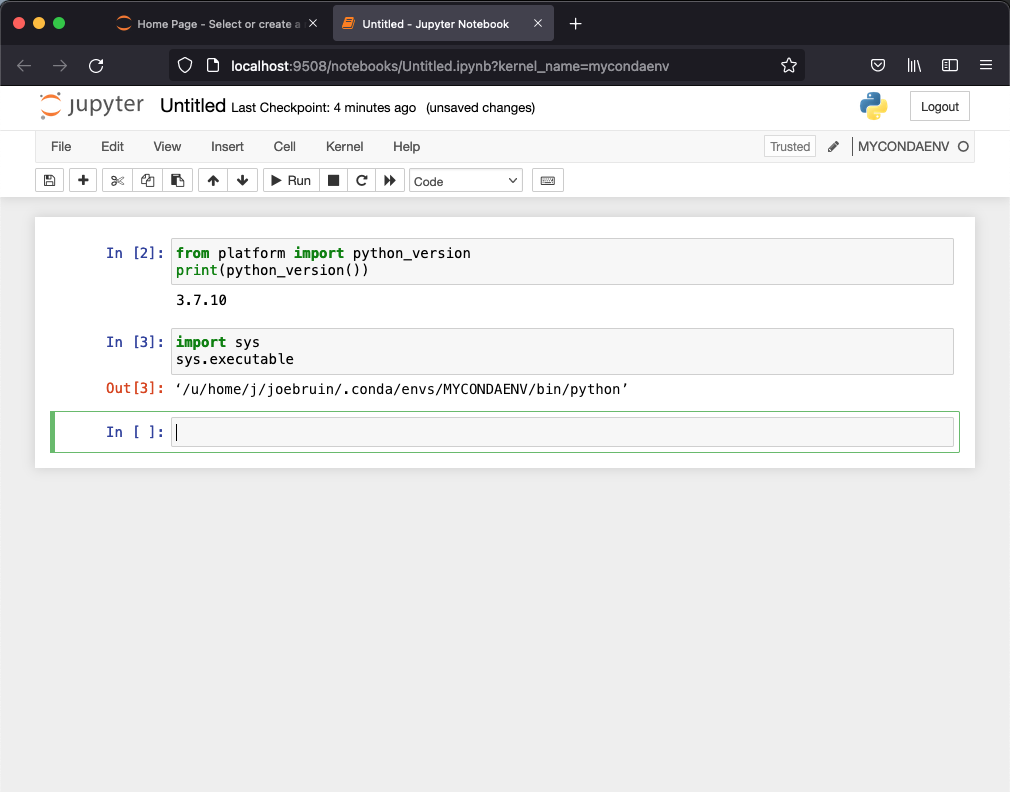
Jupyter Notebook running a python notebook within the MYCONDAENV conda environment.
Installing python libraries via conda in an anaconda python notebook
Warning
This is only possible when running within a a conda virtual environment
To install, for example, numpy, in an anaconda python jupyter notebook type:
In [1]: import sys
   ...: !conda install --yes --prefix {sys.prefix} numpy
Running R kernels in Jupyter
Several R kernels, IRkernel,are available from the jupyter interface. For example, in the figure below a Jupyter Notebook interface is shown with the New launcher menu displaying several versions of R.
Jupyter Notebook interface with the launcher menu showing, among others, several versions of R kernels.
Should you need to install your own R kernel, after starting the desired version of R on the Hoffman2 Cluster, at the R command prompt issue:
> install.packages('IRkernel')
> library(IRkernel)
for example, user joebruin part of gobruin unix group, who needs to install the IRkernel for R version 4.1.0 in order to load some R libraries that are installed in the user $HOME/apps/myRlibs would issue at the R prompt:
> IRkernel::installspec(name = 'ir410', displayname = 'My R 4.1.0')
[InstallKernelSpec] Installed kernelspec ir410 in /u/home/gobruin/joebruin/.local/share/jupyter/kernels/ir410
>
There are a few steps that user joebruin will need to perform before the kernel will be accessible from the jupyter interface, the steps are reproduced below for user joebruin (whose $HOME directory is /u/home/j/joebruin), who has installed R libraries in $HOME/apps/myRlibs for R version 4.1.0, you will need to modify the command according to your username, $HOME directory and version of R:
Alter the definition of the kernel.json, to do so on a terminal open on the Hoffman2 Cluster, issue:
$ cp -p $HOME/.local/share/jupyter/kernels/ir41/kernel.json $HOME/.local/share/jupyter/kernels/ir41/kernel.json_ORIG
now edit the file
$HOME/.local/share/jupyter/kernels/ir41/kernel.jsonand change its current content to:{ "argv": ["/u/home/j/joebruin/.local/share/jupyter/kernels/ir410/R410-kernel.sh", "{connection_file}"], "display_name": "My R 4.1.0", "language": "R" }
Create the script
$HOME/.local/share/jupyter/kernels/ir410/R410-kernel.shwhich contents will be (please update the contents in order to reflect the version of R and, if needed, the R_LIBS environmental variable (notice, if you used the default location, set up by R, to install R libraries you would not need to install your IRkernel - this example is for the sake of argument as there can be legitimate case-use that could benefit from it):
#!/usr/bin/env bash
. /u/local/Modules/default/init/modules.sh
module load R/4.1.0 > /dev/null 2>&1
export R_LIBS=/u/home/j/joebruin/apps/myRlibs

exec R --slave -e IRkernel::main\(\) --args $@
Make the
$HOME/.local/share/jupyter/kernels/ir410/R410-kernel.shscript executable by issuing the command:
$ chmod u+x $HOME/.local/share/jupyter/kernels/ir410/R410-kernel.shYou should be able to see the newly installed kernel when opening next a jupyter session on the Hoffman2 Cluster.
Installing R packages within an R notebook
To run your R notebook you might need a package (or a version of a package) that is not available yet. You can install a package directly from your R notebook using the usual R syntax, that is:
In [1]: if (!file.exists(Sys.getenv("R_LIBS_USER"))) {dir.create(Sys.getenv("R_LIBS_USER"), showWarnings = FALSE, recursive = TRUE)}
   ...: install.packages("PACKAGE-NAME", dependencies=TRUE, lib=Sys.getenv("R_LIBS_USER"))
where: PACKAGE-NAME is the actual package name that you need to install (for example: BiocManager).
For Bioconductor use instead:
In [1]: if (!file.exists(Sys.getenv("R_LIBS_USER"))) {dir.create(Sys.getenv("R_LIBS_USER"), showWarnings = FALSE, recursive = TRUE)}
   ...: if (!require("BiocManager", quietly = TRUE))
   ...:     install.packages("BiocManager",dir=Sys.getenv("R_LIBS_USER"))
   ...: BiocManager::install(c("PACKAGE_NAME", "ANOTHER_PACKAGE_NAME"),dir=Sys.getenv("R_LIBS_USER"))
Running the Bash kernel in Jupyter
The Bash kernel is available from the jupyter interface. Use this kernel to try out snippets of Bash code as if you were at the Hoffman2 Cluster command line. The Bash kernel is very handy when you are developing a recipe that you may need to share with fellow users.
Installing and Running Julia kernels in Jupyter
The IJulia kernel <https://github.com/JuliaLang/IJulia.jl> allows the Julia language <https://julialang.org/> to be run on a Jupyter notebook. Because of the way julia packages are installed, users will need to install the IJulia kernel in their $HOME directory. Directions are give here to install IJulia under python/3.9.6 and julia/1.6.3, to install IJulia for other combinations of python and julia the commands below will need to be modified accordingly.
On terminal connected to the Hoffman2 Cluster issue:
$ qrsh
$ module load python/3.9.6
$ module load julia/1.6
$ julia
at the julia prompt issue:
julia> using Pkg
julia> Pkg.add("IJulia")
terminate julia.
On a terminal on your local machine execute the h2jupynb script requesting, for example, 3 hours runtime a total of 4GB of memory and one computing core (remember to substitute user_id with your actual Hoffman2 Cluster account name):
$ python h2jupynb -u user_id -t 3 -m 4
once the Jupyter session starts you should see Julia 1.6.3 in the list of possible kernels.
Passing environmental variable to your Julia notebook
Certain environmental variables have to be set before starting a julia notebook, for the sake of argument, we will consider JULIA_NUM_THREADS, the environmental variable that sets the maximum number of threads available to Julia.
Let’s assume that you would like to run a julia notebook with a maximum number of threads available to julia equal to 4. Here are the steps to set JULIA_NUM_THREADS=4 in the contest of a notebook. After installing the IJulia kernel on the Hoffman2 Cluster make a copy of your $HOME/.local/share/jupyter/kernels/julia-1.6 to $HOME/.local/share/jupyter/kernels/julia-1.6-3THREADS
$ cp -rp $HOME/.local/share/jupyter/kernels/julia-1.6 $HOME/.local/share/jupyter/kernels/julia-1.6-4THREADS
Now edit $HOME/.local/share/jupyter/kernels/julia-1.6-4THREDAS/kernel.json and change:
"display_name": "Julia 1.6.3"
to:
"display_name": "Julia 1.6.3 - 4 THREADS"
and:
"env": {}
to:
"env": {"JULIA_NUM_THREADS":"4"}
save the file. Next time you will start jupyter notebooks on the cluster you will see a new kernel named:
Julia 1.6.3 - 4 THREADS
if you select this kernel you can then check that the correct number of threads is set by running in one of its cells:
In [1]: Threads.nthreads()
if all went well when you execute such cell you should get:
4
Installing other kernels in Jupyter
Many jupyter kernels are available from the GitHub Jupyter project repository you can either install them under your account or request that they be installed globally by opening a request ticket with our online help desk.
Passing variable to a kernel
Please see Passing environmental variable to your Julia notebook to learn how environmental variables can be set before the start of a specific kernel. In particular, the kernel.json provides the env key which function as a dictionary of environment variables to set for the kernel (for more details see: the Jupyter Client kernel specs).
Problems with the instructions on this section? Please send comments here.
Remote direct rendering
Warning
Currently this service is inactive.
It if possible to harness the computing power of GPUs on the Hoffman2 cluster to render images while displaying the result on your local client. You will need to install a VNC viewer and, if using a Windows computer, Git BASH. Here are the steps to follow:
Download and install VNC viewer.
Log on to the Hoffman2 cluster.
If you are using a Mac or Linux computer, use the terminal application to log on.
If you are using a Windows computer, use Git Bash.
At the Hoffman2 prompt, issue the command:
qrsh -l h_rt=2:00:00,gpu,P4,exclusive
Tip
You should change the time and other settings (e.g., the type of GPU card) in your qrsh command as needed.
When the interactive session is awarded, issue the following commands:
xauth add `cat /usr/local/etc/auth-for-gdm`
x11vnc -display :0
Note
Make note of the GPU node where it started.
Open a new terminal on your local machine (on Windows, please use Git Bash) and assuming that your interactive session started on g1, issue:
ssh -f -N -L 5900:g1:5900 -L 5909:g1:5909 username@hoffman2.idre.ucla.edu
Note
Substitute
g1with the actual GPU node on which your qrsh session is running (and where you have just started x11vnc) andusernamewith your Hoffman2 user name.On your local computer, start VNC viewer and set up a session with the following settings:
VNC Server localhost:0
Double click on the newly created VNC session and a VNC viewer window should appear.
Look for your account name and log onto the cluster.
You should be now logged on the GPU node, which qrsh had originally assigned to you and you can go ahead and perform your rendering.
Problems with the instructions on this section? Please send comments here.